
Inside the small decisions that turn a routine elbow MRI into a reliable one. A routine referral, at least on paper: a 57-year-old man with elbow pain after a tennis match. Simple enough, until preparation, patient comfort and stable positioning decide whether the images hold.

Written by Manuel Conte
Cardiac Radiographer · Alliance Medical, London
Ten years in MRI, from mobile units across the UK to static centres. Part of the Fourier Crew at Everything MRI and Aiterm community.
Content
1. When Routine Turns Into Reality
2. Why Elbow MRI Is More Demanding Than It Looks
3. Getting Elbow MRIs Right: Different Scenarios in Clinical Practice
3.1 Start with the forearm position
3.2 Scenario 1: 3T MRI with a knee coil
3.3 Scenario 2: 3T MRI with a flex coil
3.4 Scenario 3: Open MRI
4. Back to the Patient: When the Best Setup Is the One That Works
REFERENCEs
1. When Routine Turns Into Reality
On paper, it was a routine referral.
A 57-year-old man, 112 kg, was referred for an MRI of the right elbow after experiencing pain during a tennis match. The clinical suspicion was lateral epicondylitis. A familiar indication, a small joint, a standard examination.
Simple enough.
But in MRI, the moment something looks simple on the schedule is often the moment clinical practice proves otherwise.
The patient entered the scanning room with more than elbow pain. There was tension in his face, a forced smile, and the kind of question radiographers know well: “How long will it take?” Often, what patients really want to know is something else: Will I be okay in there?
He had only had one MRI before, a knee scan performed feet first. This time was different. The position would be different, the space would feel different, and staying still would not be easy.
Plan A was the classic superman position. Technically, it made sense, but it was not an option for this patient. Plan B meant doing everything possible in the supine position, with the elbow by his side, carefully supported and brought as close to a workable setup as possible. The scan started, but then came the next challenge: uneven fat suppression. And shortly after that, the familiar sound every radiographer knows: the buzzer.
Sometimes it means nothing. Sometimes it means the scan is over.
I brought him out and could see it on his face: relief, but also disappointment. And something like embarrassment. He had done his best in a small space, and it had not worked. That is a difficult moment for a patient, and how we react matters. So I did not rush. I sat with him, told him he had done nothing wrong, and that we were not finished yet.
Because even then, the story does not necessarily end.
This is where clinical flexibility becomes essential. Reliable elbow MRI may mean changing the position, adapting the sequence, adding more support, or considering another technology, such as an open MRI scanner. The following article brings together practical tips from clinical practice for exactly these situations: not as one fixed protocol, but as practical approaches that help radiology teams adapt when routine turns into reality.
2. Why Elbow MRI Is More Demanding Than It Looks
Magnetic Resonance Imaging (MRI) of the elbow is becoming an increasingly important tool for the evaluation of joint-related pain. It enables comprehensive visualization of osseous structures, cartilage, muscles, tendons, ligaments, and surrounding soft tissues. MRI plays a key role in the assessment of a wide range of pathologies, including epicondylitis, osteochondral lesions, fractures, dislocations, nerve compression syndromes, edema of the radial tuberosity, and bicipitoradial bursitis. Furthermore, it contributes significantly to preoperative planning and postoperative evaluation, particularly in patients with metallic implants (Pazahr et al., 2021).
Despite its diagnostic value, elbow MRI can be technically demanding. The joint is small and anatomically complex, while the structures of interest often require high spatial resolution and precise imaging planes. At the same time, image quality is highly sensitive to patient positioning, coil selection, immobilisation and motion control. Pain, restricted range of motion, body habitus or claustrophobia can further limit what is possible in practice. These factors mean that a technically ideal setup is not always clinically achievable and that radiographers often need more than one approach to obtain diagnostic images (Johnson et al., 2015).
In clinical practice, scanner selection is therefore part of the examination strategy. In my current workplace, three MRI systems are available: a 3T Siemens Skyra, a 1.5T Siemens Sola, primarily dedicated to cardiac imaging, and a 0.5T ASG Paramed open MRI scanner. Each system offers different advantages and limitations. When scheduling or adapting an elbow MRI examination, factors such as magnetic field strength, hardware and software capabilities, coil availability and patient-related considerations all need to be taken into account. These patient-related considerations include body size, ability to remain still, metallic implants and claustrophobia. (Johnson et al., 2015; Enders et al., 2011).
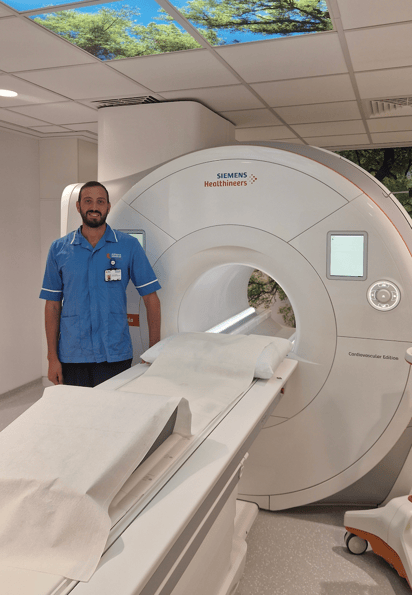
Figure 1: Manuel Conte in front of a Siemens Sola scanner prior to an examination.
3. Getting Elbow MRIs Right: Different Scenarios in Clinical Practice
Once the diagnostic question is clear, the next challenge is practical: which setup is most likely to deliver reliable images for the patient in front of you? In elbow MRI, this decision is rarely based on image quality alone. It also depends on pain, mobility, body habitus, coil availability, patient tolerance and the ability to remain still throughout the scan.
3.1 Start with the forearm position
For optimal imaging results, the forearm is generally positioned in supination, with the palm facing upwards. Supination reduces overlap between the radius and ulna and supports more consistent anatomical alignment. This can improve visualisation of key structures such as the distal biceps tendon at its insertion on the radial tuberosity, the radial head and the radiocapitellar joint (Pazahr et al., 2021).
However, the ideal position is not always possible in clinical practice. Pain, trauma, stiffness or limited range of motion may prevent the patient from tolerating supination for the duration of the examination. In these cases, pronation, with the palm facing downwards, or a neutral hand position may be considered. Pronation may also be useful in selected cases, for example when radial head instability is suspected.
The key is to understand the preferred anatomical setup while remaining flexible when the patient cannot tolerate it.
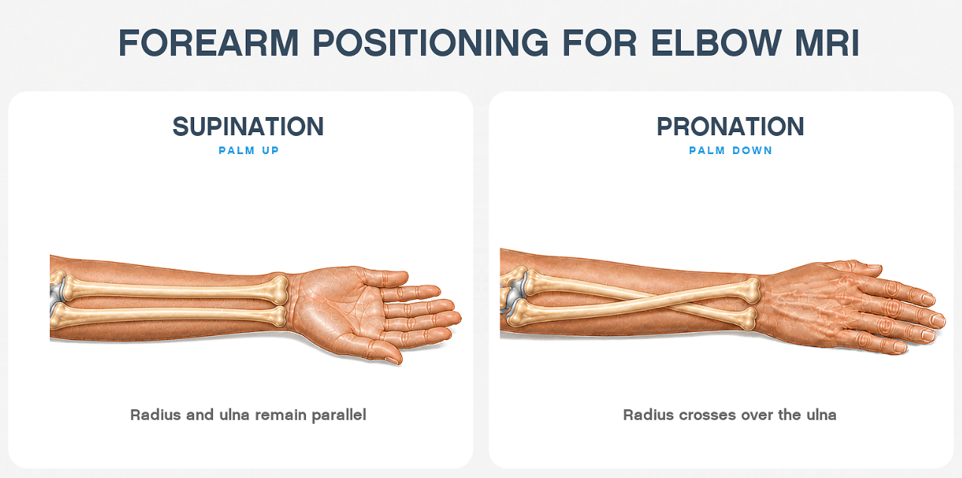
Figure 2: Anatomical illustration demonstrating the differing alignment of the radius and ulna in pronation and supination. Own illustration; anatomical reference: Kenhub (2023)..
3.2 Scenario 1: 3T MRI with a knee coil
When feasible, a 3T MRI system can provide excellent image quality with relatively short acquisition times. This is particularly valuable in elbow imaging, where patient comfort can be limited and even small movements may affect diagnostic quality. Compared with lower field strength systems, 3T offers a higher signal-to-noise ratio and spatial resolution, which can be advantageous for visualising small anatomical structures and subtle pathology (Johnson et al., 2015; Feuerriegel and Sutter, 2024).
In patients with metallic implants, however, magnetic field strength needs to be considered carefully. When available, 1.5T imaging may be advantageous over 3T if susceptibility artefacts need to be reduced, as lower field strength can help reduce metal-related distortion. The 70 cm bore diameter of the Siemens Skyra accommodates many patients, but feasibility can still be limited by body habitus, pain, restricted mobility or claustrophobia.
One option on a 3T system is the use of a 15-channel knee coil. This setup offers a strong technical advantage: compared with a flex coil, the knee coil can provide superior signal-to-noise ratio, higher spatial resolution and faster acquisition times. These are important benefits when imaging a small, complex joint such as the elbow.
The limitation is positioning. The knee coil usually requires the patient to be placed in the classic superman position: prone, with the affected arm extended overhead. A lateral decubitus variation may also be used and can naturally facilitate forearm supination, as illustrated in the figure below.
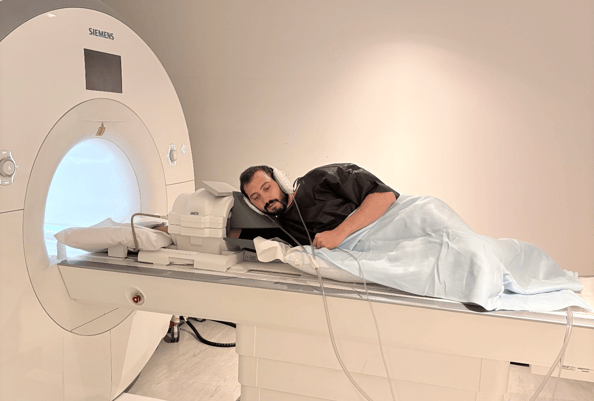
Figure 3: Lateral positioning for elbow MRI using a 15-channel knee coil, demonstrating patient support with a head pad, sandbag and pillow to stabilise the forearm and hand.
A major advantage of this setup is that the region of interest can be positioned close to the magnet isocentre, where magnetic field homogeneity is optimal. This supports more effective fat suppression, reduces artefacts and improves image quality, all of which are important when assessing inflammation, fractures or infection.
In practice, the superman position can be difficult to tolerate, particularly for patients with pain, limited shoulder mobility, larger body habitus or anxiety. The longer the patient struggles to maintain the position, the higher the risk of motion artefacts. A lateral position may offer an alternative, although it also requires careful support and stabilisation. AI-supported reconstruction and parallel imaging can help reduce acquisition time, but they do not replace the need for good positioning and patient support.
This is why proper support is essential. Sandbags, padding and immobilisation devices can help stabilise the elbow, forearm and hand. In my experience, inflatable MULTIPAD Standard positioning aids from Pearl Technology can make a noticeable difference here, as they help fill gaps, improve stabilisation and support a more efficient positioning workflow.
3.3 Scenario 2: 3T MRI with a flex coil
A 4-channel flex coil offers greater versatility in elbow MRI. It can be used in the superman position or in lateral positioning, but its main practical advantage is that it also enables imaging in the supine position. This is generally more comfortable for the patient and often better tolerated in daily clinical practice.
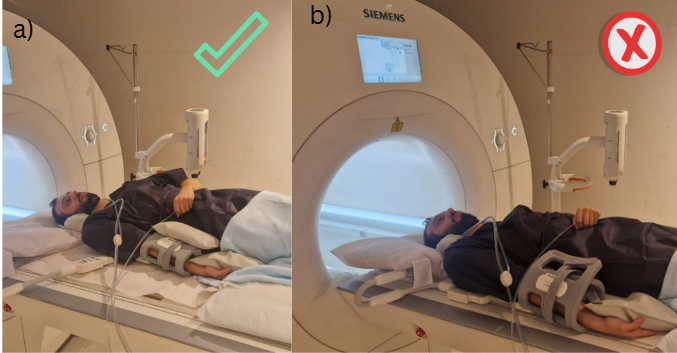
Figure 4: Positioning of the elbow MRI using a flex coil. (a) Correct positioning, with the elbow close to the isocentre and the patient’s body slightly tilted. (b) Incorrect positioning, with the elbow too far from the isocentre, which may result in suboptimal image quality.
However, this flexibility comes with technical challenges. To optimise image quality, careful positioning remains essential. Tilting the patient slightly towards the centre of the bore and using positioning aids such as pads, sandbags and straps can help bring the elbow closer to the isocentre. This is especially important in supine positioning, where the elbow naturally tends to sit further away from the centre of the magnet.
Safety also needs to be considered. When the patient is shifted to one side, MR safety pads should be used to prevent direct contact between the patient and the scanner bore. The coil should be securely wrapped around the elbow, and coil cables must be positioned carefully to avoid direct contact with the patient’s skin and reduce the risk of burns.
Despite these adjustments, bore size can remain a limiting factor, particularly in patients with a high BMI. In these cases, an optimal setup may simply not be achievable in a conventional scanner.
There are also image-quality trade-offs. Compared with a dedicated or higher-channel coil, a 4-channel flex coil may provide a lower signal-to-noise ratio and reduced spatial resolution (Johnson et al., 2015). Recent advances in AI-based reconstruction may help compensate for some of these limitations by improving image quality despite reduced signal.
Another important challenge is fat suppression. In the supine position, the elbow is often positioned further away from the isocentre, which can increase B₀ and B₁ field inhomogeneities. This may lead to uneven spectral fat suppression and more artefacts. In such cases, more robust fat suppression techniques such as inversion recovery or Dixon-based methods may be preferable, as they are less sensitive to field inhomogeneities and can provide more uniform fat suppression in off-centre musculoskeletal imaging (Omoumi, 2022).
In short, the flex coil is often the more patient-friendly option, but it requires careful setup, good safety awareness and, in some cases, adapted sequence choices to achieve reliable diagnostic images.
3.4 Scenario 3: Open MRI
Open MRI can be a valuable alternative for patients who are claustrophobic, have a larger body habitus or are unable to tolerate a conventional high-field system. One of its main advantages is the possibility to scan patients in a seated position. This can create more space, reduce anxiety and make the examination feel more manageable.
However, open MRI does not remove all positioning challenges. The elbow still needs to be positioned centrally within the coil, and this can remain difficult depending on pain, mobility and body proportions. In clinical practice, extending the arm to achieve the best possible coil position may cause shoulder discomfort in some patients, which can limit tolerance and affect positioning accuracy.
Small adjustments can make a significant difference. Pads, lateral patient orientation, chair adjustment and subtle changes in body angulation can help improve comfort and stability during the examination. As in high-field imaging, forearm supination and immobilisation remain important for image quality.
Dedicated wrist-elbow coils are generally preferred, although a knee coil may be used if necessary. Inflatable positioning aids, such as Pearl Technology MULTIPAD systems, can help adapt the setup to the patient’s anatomy, fill gaps and improve stability.
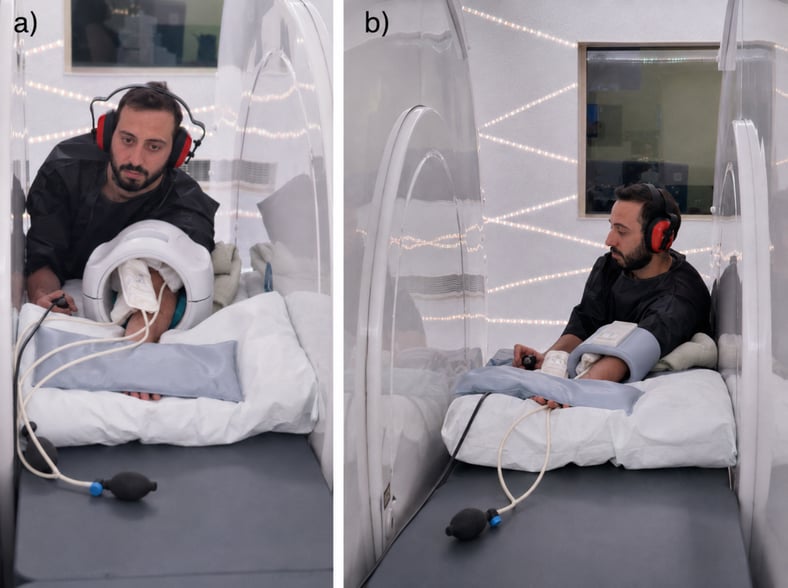
Figure 5: Elbow MRI positioning in a seated position with an open MRI scanner: (a) anterior positioning using a knee coil, and (b) lateral positioning using a dedicated elbow coil.
The main trade-off is field strength. A 0.5T open MRI system does not offer the same signal-to-noise ratio or spatial resolution as a high-field scanner. Nevertheless, recent advances in AI-based reconstruction can help improve image quality by reducing noise and enhancing spatial resolution. In clinical practice, AI-based techniques may also help reduce scan times, making longer examinations more tolerable for patients.
For selected patients, open MRI may therefore not be a compromise, but the approach that makes diagnostic imaging possible in the first place.
4. Back to the Patient: When the Best Setup Is the One That Works
Back to the patient from the beginning.
The conventional scanner had not worked that day. The first position was not tolerable, the second setup had reached its limits, and the buzzer had ended the scan before the clinical question was answered.
But there was still one option left.
A gap had opened in the open MRI schedule. I explained what it would mean: a different system, a seated position, more space, more air around him, and a setup he might actually tolerate.
And this time, it worked.
With careful padding to support his arm and help him remain still, the scan went smoothly. He was calm. He did not move. The images were not perfect by 3T standards, but they were diagnostic. They answered the clinical question.
At the end, he thanked me. Not quickly on his way out, but deliberately. For the patience, for not giving up, and for making him feel that he mattered.
That is the lesson.
Elbow MRI has no single perfect setup. The anatomy is complex, positioning is challenging, and every patient brings something different. What matters is the ability to think, adapt and stay calm when the first plan does not work.
Because reliable imaging is not created by the scanner alone. It is created by preparation, communication, technology, and the willingness to adapt the examination to the person on the table.
References
Schinnerl, C., Weber, M. A., Benninger, E., Fischer, T. S. and Falkowski, A. L. (2024) 'MRI of the Elbow – Update 2024', Rofo, 197(09), pp. 903–912.
Johnson, D., Stevens, K. J., Riley, G., Shapiro, L., Yoshioka, H. and Gold, G. E. (2015) 'Approach to MRI of the Elbow and Wrist: Technical Aspects and Innovation', Magnetic Resonance Imaging Clinics of North America, 23(3), pp. 355–366.
Pazahr, S., Sutter, R. and Zubler, V. (2021) 'MRI of the Elbow: How to Do It', Seminars in Musculoskeletal Radiology, 25(04), pp. 538–545.
Kenhub (2023) Pronation and supination of the forearm. Available at: https://www.kenhub.com/en/library/anatomy/pronation-and-supination (Accessed: 3 April 2026).
Nguyen, B. (2022) MRI ELBOW IMAGING – How I Do It. Available at: https://www.youtube.com/watch?v=w2r5wR1VSLc (Accessed: 12 April 2026).
Feuerriegel, G.C. and Sutter, R. (2024) ‘Managing hardware-related metal artifacts in MRI: current and evolving techniques’, European Radiology, published online 21 February 2024. https://doi.org/10.1007/s00330-024-10545-1
Enders, J., Zimmermann, E., Rief, M., et al. (2011) Reduction of claustrophobia during magnetic resonance imaging: methods and design of the “CLAUSTRO” randomized controlled trial. BMC Medical Imaging, 11, 4. https://doi.org/10.1186/1471-2342-11-4
Omoumi, P., 2022. The Dixon method in musculoskeletal MRI: from fat-sensitive to fat-specific imaging. Skeletal Radiology, 51(7), pp.1365–1369. https://doi.org/10.1007/s00256-021-03950-1