As a large ball joint, the shoulder is often the location of chronic complaints that may be clinically associated with pain and functional limitations. It is not uncommon for young athletes to complain of pain that is accompanied by unremarkable x-ray findings. In this case, MRI is considered the gold standard for further clarification of the complaints.
One of the decisive prerequisites for a high-quality MRI examination of the shoulder is the positioning of the patient. This is not always easy, if we think of obese or muscular patients or patients with limited mobility due to severe pain. Here, the use of positioning and fixation aids is a necessity to allow comfortable positioning. Consequently, we address the following topics:
- Overview of MRI of the shoulder
- Indications for shoulder MRI
- Tips & tricks for preparation
- Patient positioning strategies
Background
Causes of shoulder injuries
The causes of shoulder pain and shoulder injuries are varied. Work-related and sports injuries (mainly during overhead activities) as well as degenerative diseases in old age are of great relevance. Among acute shoulder injuries, shoulder dislocation is particularly common, accounting for 30%. The tendency of the shoulder joint to dislocate is due to the great mobility of the ball joint with a lack of proper guidance by surrounding bones. The shoulder joint is significantly guided and stabilized by the rotator cuff and capsular ligamentous apparatus. Rotator cuff disorders are one of the most common causes of shoulder joint pain and dysfunction in adults.
Indications
What are the indications for shoulder MRI?
-
Lesions of the muscle-tendon apparatus
-
Rule out inflammatory processes
-
Rule out tumor
-
Suspected fracture
-
In case of shoulder instability
-
Injuries in the acromioclavicular joint
MR arthrographies are a special case of MRI of the shoulder. If therapeutic consequences result from partial ruptures, there are the following indications:
-
Instability (assessment of the labrum)
-
Suspected rotator cuff injury (also in pre-operated shoulders)
For direct arthrography, contrast-to-noise ratio and distension are best 15 minutes after injection and then decrease rapidly. Therefore, shoulder MRIs should be completed no later than one hour after injection.
Preparation and execution of shoulder MRI
Preparation of the patient
The patient removes all metal parts. Items such as keys, wallet, check cards, jewelry, hair clips, piercing, hearing aids, etc. also remain in the changing room. Special dentures with magnetic material are not allowed in the magnetic field. In the case of electronic or metallic implants, consult with the radiologist, if necessary, as well as in the case of splitter injuries. Women should have their bra removed, but a T-shirt can be left on.
The following two rules should definitely be followed when preparing the patient for MRI:
1. bare skin must never have direct contact with the tube or coil. A small cushion or piece of paper must always be placed between all contact points. Direct contact can cause severe burns. If a part of the body touches the gantry or if contact occurs between the coil and the tube, images with artifacts may result, especially in sequences with fat suppression.
2. skin-to-skin contact must also be avoided, i.e. no folding of hands, legs must not be crossed and contact of hands with bare legs should also be avoided.
Tattoos are usually not a problem, but you should know that some pigments contain iron or lead. They can heat up and also cause severe burns. This must be pointed out.
Once the patient is prepared, the examination can begin. The radiographer/MRI tech explains the examination procedure and draws particular attention to the avoidance of movement artifacts.
Depending on the indication and after consultation with the radiologist, it may be useful to inject contrast media.
Coil selection
The shoulder is usually examined with a dedicated shoulder coil.
If this coil is not available, a flex coil can be used as an alternative. Flex coils are flexible surface coils that adapt to the patient's anatomy. They have a good signal-to-noise ratio and very good spatial resolution and should therefore be used for smaller objects.
Basically, the shorter the distance between the examined body part and coil, the better the signal.
Positioning of the patient
The patient lies in a supine position with the head first on the examination table. A head shell such as the PearlFit Head/Neck or PearlFit Cushion is used for comfortable positioning and also for easy stabilization at the same time. If a special shoulder coil is available, the joint to be examined is positioned in the coil so that it is completely covered. Any gaps between coil and joint are padded out with positioning aids. In this way, motion artifacts can be reduced.
If the examination is performed with a flex coil, the shoulder joint is also located in the center of the coil. The coil is then fixed in place using a strap. If possible, a cushion (e.g. PearlFit Cushion 30x20x4) should be placed under the belt so that the breathing movement is not transferred directly to the coil. In addition, with a flex coil, a sandbag on the upper side of the shoulder at the level of the clavicle would be advantageous, because this can also additionally limit movement artifacts.
For both types of coils, the use of the so-called MULTIPAD positioning aids, for the comfortable immobilization of patients within the coil, has proven to be very effective. The MULTIPAD is positioned between the patient and the coil and then manually inflated. This ensures that the cavities are filled evenly, and pressure points can be avoided. 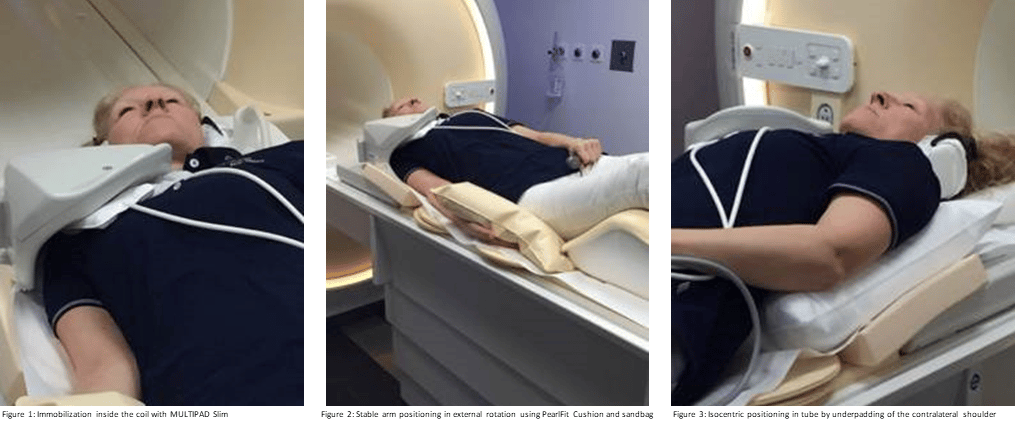
The arm to be examined should ideally be positioned next to the body in external rotation. This allows good assessment of the anterior capsular components and the subscapularis muscle. If external rotation is not possible, the arm is positioned in the zero position, i.e. the thumb points upwards towards the ceiling. The arm should then be fixed in the correct position. This can best be achieved by combining a comfortable, adaptable pad such as the PearlFit Cushion and a sandbag.
The legs are also padded so that the spine is relieved. In this way, patients are usually more relaxed. The patient is then fitted with hearing protection and an emergency bell.
Sometimes positioning can prove to be very difficult, especially if the patient has broad shoulders and/or is very muscular. In order to obtain a better image quality, it is necessary to position the shoulder joint to be examined as far as possible into the isocenter, since homogeneity is greatest there. This is particularly crucial for image quality in fat-suppressed sequences. We can therefore elevate and pad the opposite side slightly so that the patient lies somewhat obliquely in the tube. For this, we can use either the normal PearlFit Cushion or a PearlFit Wedge. These are particularly adaptable and still provide the required stability.
Examination technique and Sequences
Due to its anatomical nature, the shoulder is not easy to examine. Planning requires great accuracy and anatomical knowledge. It is recommended to prepare individual localizers in all three spatial planes for all joints. This makes planning easier to understand, even for beginners. The individual measurements, also in three planes, should not be planned on the localizers but on the sequences themselves.
The recommendation of the Working Group for Musculoskeletal Diagnostics of the German Radiological Society includes the following MRI sequences for a standard MRI examination of the shoulder when there is a question about tears of the biceps tendon, occult fractures or for the diagnosis of transmural rotator cuff lesions:
-
PD FS paracoronal
-
T1 paracoronal
-
T2 parasagittal
-
PD FS transversal
-
Slice thickness 3mm
-
FOV 160mm
Final remarks
Especially in shoulder examinations, comfortable and stable positioning is not always easy due to the patients' physical constitution (pain, weight, etc.). Therefore, good preparation of the patient and the choice of adequate positioning aids are basic prerequisites for the successful performance of MRI examinations.
When explaining the examination to the patient, special reference should be made to motion artifacts. A relaxed and comfortable positioning is the prerequisite for this. Furthermore, positioning in the isocenter should always be the goal.
The word "burns" usually generates a higher level of attention in patients and thus facilitates an explanation on the subject of skin-to-skin contact or skin-to-coil contact. To avoid this contact in general, clothing such as a T-shirt or the like can be left throughout the exam.
If the patient has a tattoo, he or she will be informed of possible heat generation and advised to press the emergency bell.
Credits to: Nicole von Lepel, experienced MRI tech, freelancer and trainer, for preparing the content.